


How To: Upcycling Ideas for The Garden
Breathe new life into old household items by giving them a thrifty makeover for the garden. There are so many ways you can add a little personality to outdoor spaces without spending a lot of money. From pretty painted pots and repurposing an old bucket to innovative outdoor living inventions, upcycling is great for the environment, reducing landfill waste and saving you money.

Check out our favourite upcycling ideas for the garden to turn your old trash into new treasures. So, if you have any items in your home that you’ve ear-marked for the skip or need some TLC, then you’re in luck! Now is the time to get creative and add some rustic charm to you home. An ideal activity to do as a family and with the kids.
Pallet Planter
Wooden pallets are extremely versatile and perfect if you’re looking for a new way to display flowers and herbs. An easy weekend project to spruce up your garden.

What you’ll need: Wooden pallet, paint, wood stain or varnish, waterproof weed fabric membrane, staple gun, compost, and plants you want to display.
How: Paint or stain your pallet and allow to dry. Turn your pallet, so the slats are horizontal. Cut your weed membrane to size and staple to the relevant sections of the pallet, to create the area you’ll add your soil and plants to. Once the weed membrane is secured, start adding your plants and compost. Here is a quick video we found to help you. Be sure to add plant food to help your plants grow.
Garden Chandelier
Add a touch of elegance and luxury with a garden chandelier by upcycling an old light fitting into a statement planter for your outdoor living space.
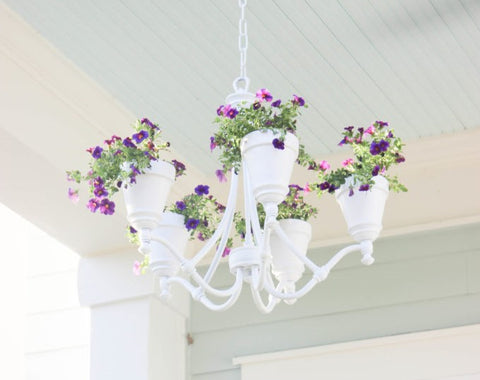
What you’ll need: Chandelier, plant pots to fit the chandelier holders, paint and primer (spray paint works best), strong glue, compost, plants and flowers. If your chandelier has 3 light shades, you’ll need 3 pots and plants.
How: Take off the chandelier shades and remove any wires, using a wire cutter. Clean your pots and glue them to the chandelier shade holders and let dry for 24 hours. Paint with primer and your chosen paint colour. You may need several coats to achieve your desired finish. Lastly add your compost, plants and hang! We have a large selection of garden tools and equipment to give you a helping hand.
Tin Can Planters
Don’t throw away old tin cans, upcycle them into pretty planters to add a splash of colour to your outdoor living space. You can decoupage them, paint them or use chalk paint, the possibilities are endless. To decoupage….

What you’ll need: Decorative paper or napkins, scissors, paint brush, paint, glue, gloss acrylic varnish.
How: Prepare the surface by cleaning the tins. Select your pictures and cut them out. Glue the pictures in place, smooth out any wrinkles and wipe away excess glue. If you wish you can paint the tin cans before applying your pictures. Once dry varnish with at least two coats. Now you have yourself new pretty planters for your blooms.
Top Tip: To transform your decoupage tins into a wind chime, drill a hole into the base of each tin and tread twine through the tin cans, making a knot after each one to secure it. Leave enough twine for hanging. By pictureboxblue.com

Teacups & Mugs
Transform teatime into garden time by turning pretty china into a DIY bird feeder to help our feathered friends thrive and attract wildlife to your garden.

What you’ll need: Teacup and saucer, strong all-purpose glue, twine or something to hang the feeder, masking tape (optional) and bird food.
How: Turn the teacup on its side, with the handle facing upwards. Glue the teacup to one half of the saucer and allow to dry. Use strips of masking tape to hold in place whilst it dries. Tie the twine to the handle and hang. Finally fill with your chosen bird food.
Take a sneaky peek at our Helping Garden Birds to Survive & Thrive blog post, full of tips from choosing the right location for your feeder to keeping it clean.
Wellies and Tyres
If your wellies have seen better days, turn them into a little colourful haven for your plants. Ideal to add a touch of personality and fun.

What you’ll need: Wellington boots, a drill, a few pebbles, compost, your plants and flowers.
How: Thoroughly clean your wellies and dry. Drill a few holes in the base of the wellies boots, this will allow room for drainage. Fill the boots with pebbles first then add compost ensuring it fills the boots right to the toe. Plant your seeds or plants and top with a little more compost. Place them where you wish.
Top Tip: If you are short of floor space, hang your welly planters along a fence or balcony. Be sure to secure them carefully.
Happy upcycling!
For more upcycling and "how to" inspiration have a look at our other guides online:
How To: Upcycle Old Garden Pots
How To: Grow Your Own Vegetables
How To: Create Take Away Style Coffee At Home, full of recipes and pro barista tips.
How To: Make Homemade Ice Cream, without any fancy equipment.